Introduction
This post will provide an overview of the process of getting Klipper working on a Sovol SV06 3D printer. There are better and more detailed guides around the internet on how to do each individual step in this process, but when I was undertaking this process myself, I wasn't able to find a guide that pointed me to which steps I had to do exactly.
So I'm hoping this guide will serve as a jumping off point, so that you can gain a basic idea of how the Klipper ecosystem works, and which software components you will need to configure to get to a working Klipper setup.
Klipper
Klipper is a really powerful custom firmware for 3D printers. The SV06 runs a custom version of the Marlin Firmware, but Klipper is generally considered to be superior due to the faster potential print speeds Klipper unlocks.
Klipper achieves this faster speed in a few ways. Firstly, all the processing that is typically done by the microcontroller (MCU) onboard your printer's controller is offloaded to a (usually faster) external MCU/computer such as a Raspberry Pi.
Secondly, printing faster decreases the quality of your prints through issues such as ringing/ghosting (repeating patterns appearing on print due to vibrations of your printer at it's resonance frequency), and oozing as the extruder moves, and blobbing when printing corners. Klipper aims to mitigate these issues using resonance compensation and pressure advance. These links also explains the issues and solutions in more detail, if you are interested in further reading.
Overview
Klipper has two parts, the Klipper Firmware runs on the printer MCU, and Klipper Host runs on a connected computer (I used a Raspberry Pi 3). The Klipper Firmware on the printer is 'dumb', all the smart logic, including parsing the Gcode and calculating the corresponding stepper movements are done on the Klipper Host, and sent to the Klipper Firmware on the printer, whose primary job is to forward these basic instructions the stepper drivers on the printer control board.
The key here is that Klipper Firmware does minimal processing on it's own, even the logic that drives the user interface on the inbuilt printer display is handled by the connected Klipper Host.
Firmware Installation
There is a fantastic GitHub Repo containing some great information on the process of Klipper installation on the SV06. I found this to be a very useful resource when going through this process myself.
This repo explains the installation process very well, and will be maintained better than I can update this blog post in the future. As such, I'll mostly be linking to sections of that repo rather than restating the installation process here.
Flashing
The first step is replacing the Marlin firmware on the printer with the Klipper firmware.
Follow the flashing instructions here. Note that the repo states that some users have had issues using the Sovol included MicroSD card for the flashing process. However, I was able to use the included card for flashing both Klipper and the original firmware without any problems. Your mileage may vary.
The flashing process is reversible, you can always go back to the original firmware provided by Sovol. The flashing process is identical, just remember to rename the .bin file you're flashing, because a particular filename can only be flashed once.
Host Installation
I'll provide a brief guide here of preparing and installing Klipper Host software on a Raspberry Pi, since most guides don't supply this info.
Many guides for Klipper available for this step suggests installing specific OS builds such as OctoPi or MainsailOS. These can make getting started with their respective software easy, but any customisation beyond the use of the intended software can result in issues.
As such, I'd recommend going with a vanilla Raspbian install, and then installing your preferred software stack on top of this. Additionally, Raspbian has very good community support if you run into any issues.
OS Install
For this step, you will need the following:
- Raspberry Pi
- MicroSD Card (32 GB should be adequate)
- PC with Raspberry Pi Imager installed
Using the Raspberry Pi Imager, first select Choose OS → Raspberry Pi OS (other) → Raspberry Pi OS Lite (64-bit is preferred). Then, select the SD card you want to flash to.
Next, go to Advanced Options (cog icon in bottom right corner). Set username to pi and enter a password for your user account. Enter your Wi-Fi credentials. Enable SSH, and ensure access is enabled using the user account password (only use password access for SSH if you plan on using the RPi on a trusted local network). Optionally, if you want to access the Pi at an address such as 3dprinter.local, enable this option by setting a hostname.
Confirming that everything looks ok, flash the SD Card.
Preparing Devices
Firstly, make sure that you have a quality power supply and cable for the Pi that meets the power requirements and can reliably power the Pi. You've probably seen this advice on other guides, but it's particularly important here because if the Pi randomly turns off during a print, your print will also stop (recovering from failed prints in Klipper is not an inbuilt feature, and is a very involved, imperfect process). Mainsail will show a warning if the RPi has encountered power issues since the last boot up.
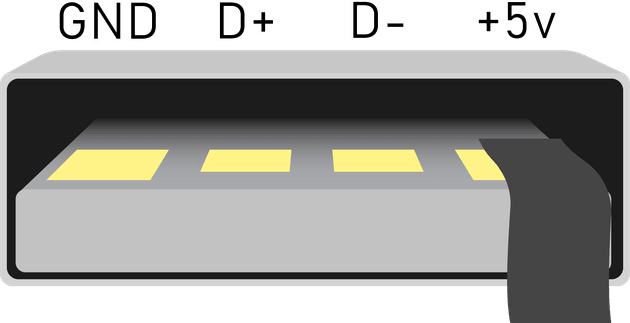
Secondly, it's necessary to prepare the micro USB cable that you will be using to connect the Pi to the SV06. We do not want the +5v connection of the USB cable, so it's necessary to disconnect it. The easiest way is to cut a thin piece of electrical tape (approx. 3mm x 15mm), and stick it on the +5v pin on the USB A connector.

Configuring Raspberry Pi
Insert the flashed SD Card into the RPi, and plug it in. Now would also be a good time to plug in the printer cable. Wait for the RPi to boot, then connect to it via SSH (easiest way to find the RPi IP is to check your router's device list).
We will be installing Klipper using KIUAH. KIUAH will greatly simplify the install process for the various software components required. Follow the install instructions here to install and launch KIUAH.
Next, use KIUAH to install Klipper (Host software), Moonraker (API for Klipper Host), Mainsail (Web UI for your printer).
From here, return to the SV06 Klipper GitHub repository, and continue setting up Klipper from this step. Follow the steps on the repo to Download OSS Klipper Configuration (download the files Klipper Host needs to correctly talk to the Klipper Firmware and control the SV06), Adjust Configuration with MCU Path (show Klipper Host how to connect to your SV06), Configure Your Printer (run calibrations and prepare your SV06 for printing) and Adjust Your Slicer (set the start and end Gcode that your slicer generates to work properly with Klipper).
After following these steps, you should hopefully have a working Klipper install. Mainsail, which is the web interface you will use to manage your printer, should be accessible at http://<ip of your RPi> (or something similar to http://3dprinter.local, if you set up a hostname previously).
Webcam
A webcam is super useful to monitor your printer remotely. I had an old laptop lying around and I was able to convert its built-in webcam to USB. Here's a great tutorial by DIY Perks on how to do this. My webcam was 3.3v, so I had to use a 3.3v regulator and some capacitors to drop the USB 5v down to 3.3v.
Once you have a webcam connected, run KIUAH again, and install Crowsnest (management software for webcams). If you have a camera attatched, the default configuration will start the stream automatically. For further configuration of camera settings, see here.
To add the webcam to the Mainsail interface, follow the instructions here. The default Crowsnest stream URL for your first webcam is /webcam/?action=stream.
Summary and Final Thoughts
My experience using Klipper has been generally excellent. After I performed all the tuning and calibration, things were really great. I was able to push print speeds higher than I had been able to with stock firmware. My prints were completing faster, with only a minimal drop on quality, thanks to input shaping and pressure advance.
I initially ran into a significant issue where the printer was randomly disconnecting from the RPi in the middle of print. Using dmesg, I found the error ch341-uart ttyUSB0: usb_serial_generic_read_bulk_callback - urb stopped: -32. I tried several things to try to fix this, including double checking power supply to the RPi, changing cables to the printer, etc. I even ended up going back to the stock firmware.
But once you've used Klipper and experienced things like print speeds that consistently outperform the slicer estimates, it's really hard to go back. So I gave Klipper another try, this time using a different MicroSD card. To my surprise, this seems to have solved all my reliability issues.
Update: This did not in fact solve my reliability issues. See USB Reliability Update section below.
Next Steps
Now that you have Klipper installed, consider getting input shaping working to improve the quality of faster prints.
With Klipper you can save time and send Gcode to the printer directly from your slicer. Look into Klipper/Moonraker integrations for your slicer, here is the one for Cura (GitHub). Info for other slicers is available on the Klipper docs.
If you use Home Assistant, there is a Klipper integration that will let you use data about your printer for your automations.
Klipper also has other quality of life features. I've connected my printer to a smart plug, which automatically turns on the printer when I send a Gcode file, see Klipper docs and Moonraker docs for more info on how to do this. You could set up a Home Assistant automation to automatically turn off the smart plug after a print is complete to save on electricity.
Why not 3D print a case for your Raspberry Pi and mount it directly onto the printer? I 3D printed this sleeve case for my RPi and mounted it just above the control box using cable ties.
Now that you've got a full linux computer strapped onto your printer, the possibilities are endless.
USB Reliability Update (July 06)
After using this Klipper setup for a while, I noticed that the random printer disconnections with error ch341-uart ttyUSB0: usb_serial_generic_read_bulk_callback - urb stopped: -32 had not stopped. I initially assumed that this was caused by an unreliable SD card, so I attempted to solve this by switching to an SSD boot drive. However, this did not solve the issue.
I then found that others also seem to be having this issue with similar setups involving connections between a RPi and USB to UART ICs similar to the CH340G found in the SV06.
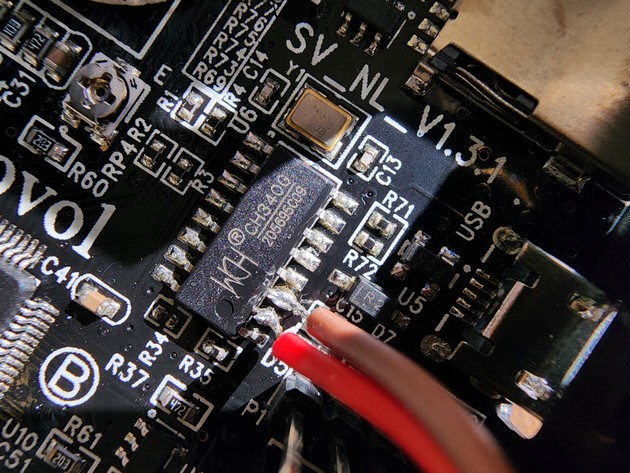
I decided to bypass the CH340G IC altogether and use the UART interface directly built into the RPi. This involved opening up the SV06 controller and soldering two wires like this.

Required connections:
- CH340G Pin 2 (TX) → RPi GPIO14 (UART TX)
- CH340G Pin 3 (RX) → RPi GPIO15 (UART RX)
- GND → RPi GND
Some software configuration is necessary to get the UART interface operational on the RPi side, see this guide and RPi documentation. I followed additional steps to get the better performance PL011 UART working on GPIO14/15 of my RPi 3B.
Getting Klipper to use the RPi's UART interface is as easy as replacing the connection line in printer.cfg with serial: /dev/serial0.
After this modification, the connection between the RPi and the printer has been rock solid, no more random disconnects during prints.