Introduction
I recently had a solar system installed, which included a Solis S5-GR1P5K Inverter and a Solis-EPM1-5G Export Power Manager (EPM).
The inverter is responsible for the DC to AC mains step-up required to use the energy generated by the photovoltaic (PV) cells for grid-connected appliances in the house, and for backfeeding into the grid when there is an excess of generated power. The EPM is simply measuring the power flowing in/out of the house. This is necessary for consumption measurement, since the inverter only reports the power generation.
This system comes with a Wi-Fi adaptor that reports all generation/consumption data back to the manufacturer, Solis, who makes these available to the user through the SolisCloud App.
Naturally, I wanted direct access to this data to integrate it into Home Assistant. This would let me view live data on my own custom dashboards, and also maintain long-term statistics.
Why Not Use Solis API?
To get access to the raw data values, Solis does provide an API to pull this data from their servers. Someone has created a Home Assistant integration for this purpose, which works quite well. However, this solution comes with quite a few downsides.
Firstly, Solis asks you to sign an NDA and agree to T&Cs to get access to the API, which is an unnecessary hassle; you shouldn't need to sign anything away to get access to data that is generated by hardware that you paid for and own.
Secondly, the data ingestion rate for SolisCloud is every five minutes, meaning the max rate that you can get data for your PV system is quite slow.
Local Data Access
This entire project would not be necessary if Solis provided a local data access method so that we could query the PV system locally without having to go through their servers. Since this is not the case, I'll be detailing how we can do this ourselves to get the data we need directly from the PV system.
Hardware
The Solis inverter, EPM, and Wi-Fi adaptor communicates with each other using the RS485 protocol. The inverter and EPM have registers that the Wi-Fi adaptor reads/writes to using this protocol (to read data, or set certain settings on the inverter or EPM). Our task is to replace the functionality of the Wi-Fi adaptor with our own hardware.
For an extremely detailed reverse engineering of the original Solis Wi-Fi adaptor (plus additional details on what it takes to replace it), see this GitHub Repo. When I was working on my own implementation detailed here, this resource was an invaluable starting point.
The above repo provides information about reflashing the original Wi-Fi adaptor with ESPHome. This may be the best option if your solar system is outdoors, as the original device is weatherproof.
However, my installation is indoors, so I do not need it to be weatherproof. So I decided not to do this due to a couple of reasons: I wanted to keep my original Wi-Fi adaptor functional, and building a replacement was cheaper than buying a second one.
Electronics
The design of the replacement is quite simple. All we need is a RS485 (Modbus) to UART module (I used the HW-0519), and an ESP8266/ESP32 (I used the ESP32) to use as the ESPHome node. These are connected together, and also to the Modbus connector as shown.

The system here is powered by the 5V rail from the Modbus connector.
Connector and Enclosure
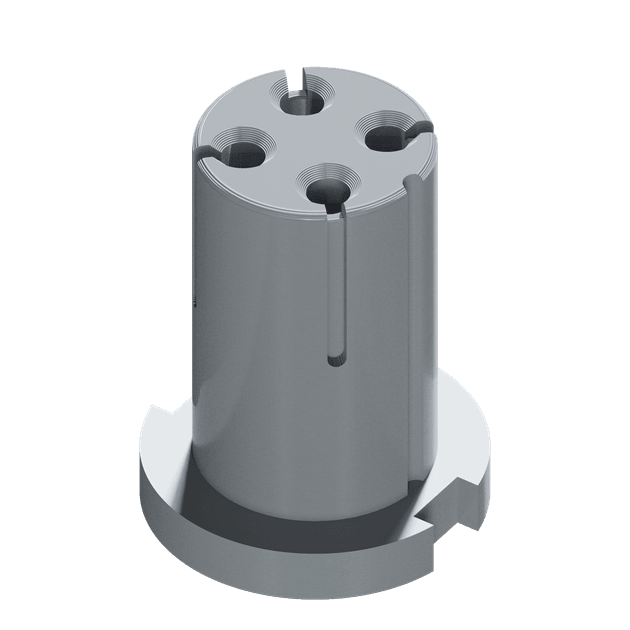
The RS485 connection is implemented in the Solis system using the Exceedconn EC04681-2014-BF connector. This can be purchased online, but doesn't seem to be available from first-party sellers, and third party sources (see purchase links) are quite expensive.
So, I instead modelled the connector and 3D printed it.

I printed this with a 0.4mm nozzle in TPU with, 0.12mm layer height, 0% infill and two outer wall layers. Since the connector is quite large, all the details present came through on the final print.
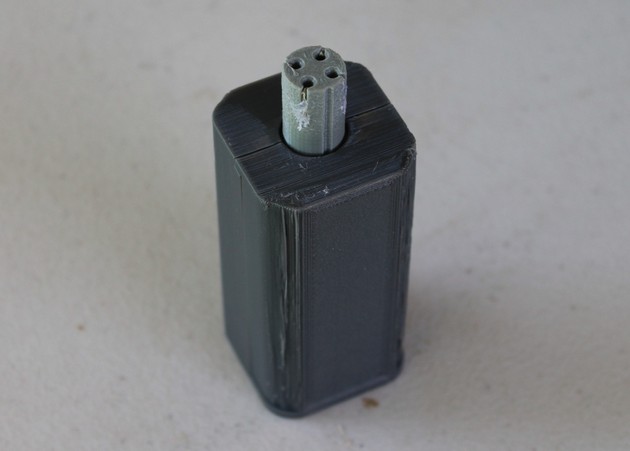
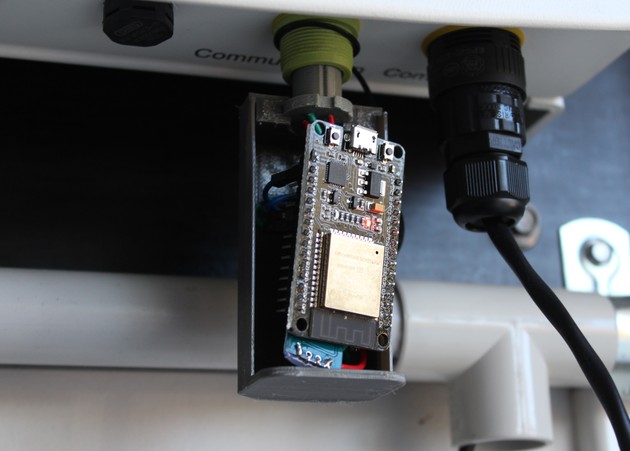
I also designed an enclosure that would hold the electronics. This should ideally printed in something more heat-resistant than PLA (e.g. PETG or ABS). The final implementation looks like this.

I stripped ~35mm of low gauge wire, pulled it through the connection holes in the 3D printed Modbus connector, then bent it around to the outside and hot-glued them inside the channels on the outer cylinder. These are the DIY contacts for the connector.
It's quite a janky solution, but since my installation has no weatherproofing requirements, it works without any issues.

Software
All the config files referenced here can be found on my fork of the original repo.
Base Config
I've made some modifications to the original base config to work with the ESP32, this can be found here. This config requires that you have a valid secrets.yaml file with the required values. You will additionally need to fill out the timezone string for your particular location.
Inverter and EPM Configs
The solis-modbus-inv.yaml and solis-modbus-epm.yaml files contain the specifics of communicating with the inverter and EPM respectively. These files should be placed in the paths specified in the packages section of the base config (esphome/common/ in this case).
The solis-modbus-inv.yaml file was forked from the previously referenced GitHub repo, with only minor changes.
I created the solis-modbus-epm.yaml file as the original author did not have a config for the EPM. This was created based on Solis RS485 protocol documentation (see below for download).
Limitations
The settings of the inverter and EPM can be changed over Modbus, however, I wasn't able to get this to reliably work for the inverter. Since I didn't require this functionality, I chose to remove these sections from my versions of the configs. See this GitHub issue for more information.
Additional Data Processing in Home Assistant
Outlier Rejection and Improved Power Resolution
While my own implementation has been working quite well over several months, I have noticed that occasionally some of the EPM values will go unrealistically high/low. This seems to be an issue with the data that is being returned by the EPM itself, so I've implemented some software filtering within Home Assistant to prevent these outliers flowing through to visualisations, etc.
Additionally, the power figures returned by the EPM have a maximum resolution of 100w. As a workaround to get better resolution, the voltage and current can be multiplied together to get the power.
Both of these fixes can be implemented as a template sensor:
# configuration.yaml

sensor:
  - platform: template
    sensors:
      solar_epm_power_a_high_res:
        friendly_name: "Solar EPM Power A High Res"
        device_class: power
        unit_of_measurement: W
        value_template: >
          {% if states('sensor.solar_epm_ac_i_a') | float <= 100 %}
            {{ (states('sensor.solar_epm_ac_i_a') | float * states('sensor.solar_epm_ac_v_a') | float) | round(-1) | int * (-1 if states('sensor.solar_epm_power_a') | int > 0 else 1) }}
          {% endif %}
Calculating Energy Consumption
A template sensor that monitors actual energy consumption can be implemented as follows:
# configuration.yaml

sensor:
  - platform: template
    sensors:
      solar_home_consumption:
        friendly_name: "Solar Home Consumption"
        device_class: power
        unit_of_measurement: W
        value_template: "{{ (states('sensor.solar_epm_power_a_high_res') | float + states('sensor.solar_active_power') | float(0)) | round(-1) | int }}"
Final Thoughts
That's it! After flashing the ESPHome config and plugging in the node, you should be able to access your Solis inverter and EPM data from Home Assistant.
Do note that since you will not be able to use the original Solis Wi-Fi stick concurrently with ESPHome, your solar production and consumption data will not be getting sent to Solis. This means the SolisCloud app will not work any more; if you need data visualisation, you will need to set this up yourself within Home Assistant. Additionally, you are now responsible for saving and backing up your own data. For long term storage I use InfluxDB.
Links and Downloads
Downloads
- Modbus Port 3D Model → modbus_port.stl
- Enclosure 3D Model → enclosure_p1.stl, enclosure_p2.stl
- ESPHome Node Full Design (port + enclosure) → solis_esphome_node_full.step
- Solis RS485 Docs → Solis_RS485.pdf
Purchase Links
- HW-0519 RS485 to UART Module → Aliexpress
- Exceedconn EC04681-2014-BF connector → eBay (third-party)